New article in this series “Nordic skiing”, we are going to focus on an essential and exciting element, skins for ski touring.
Skins for ski touring are made of hair which serves to prevent the ski from rolling back down the slope when going uphill. When you are with the grain of the hair, you slide. When the hair is caught in the wrong direction, it blocks you. It seems simple but there are many subtleties to be aware of to avoid problems.

A little history …
Originally, around the 1930s, (seal) skins were made from real seal hair. I assure you, this has not been the case for several decades now. We should also, to be completely correct, talk about Self-adhesive anti-recoil lint or self-adhesive skin. The materials used today can be natural or synthetic, the choice will depend on the practice towards which you wish to move.
Modern skin materials
As we mentioned, current skins are no longer made of seal hair. There are two main materials for making skins: mohair and synthetic.
- Mohair: These are skins made with Angora goat hair. They have the advantage of having good gliding quality but they wear out more quickly. 100% Mohair skins are to be reserved for competition use only.

- Synthetic (nylon): These are more durable and affordable skins. The grip is good but the glide is not as optimal as with mohair skins.
- Combination skin: Made of a blend of mohair (~70%) and nylon (~30%), they offer the best compromise between glide, durability and price. This is the choice of most practitioners.
Innovation in the world of seal skins
For several seasons now, the manufacturer Fisher has been offering a brand new technology: scaled skins. Profile ". An invention strongly inspired by their experience in cross-country skiing, the principle of which is similar. We stick what looks like a chipped sole covering even the edges. According to the manufacturer, and tests carried out by other skiers, this type of skin offers optimal glide and an effort saving of around 20%.
As the ski touring market is booming, we can hope to discover new innovations in the years to come.
How do seal skins fit on skis?
Skin that sticks...
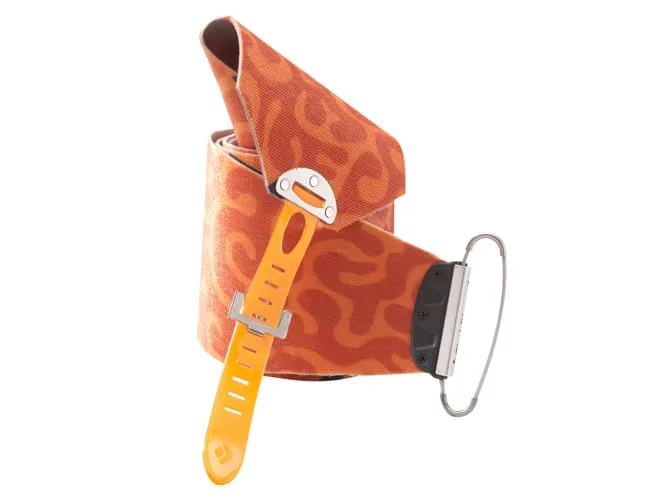
Traditionally, the skins are held under the skis with glue and tip and tail fasteners (optional).
The fasteners allow the skin to be well positioned and stretched correctly during installation. The skins are then glued to the length of the ski, ensuring that there is no snow on the sole.
A well-cut skin should cover the sole of the ski but not the edges. They are generally cut 10/15 cm from the heel and the ends must be rounded. Note that some brands sell skins specifically cut for their skis for simplicity. If skins are most of the time sold with a cutting tool, you can contact a specialized sports store to be sure that the cut is perfectly suited to your skis!
For competition, racers use much shorter skins without attachments to the ski heels. This gives them better glide and less weight. The use of a tensioner on the spatula also makes it possible to remove the skins without leaving the skis to save precious time. The disadvantage being that you need glue in perfect condition so as not to have any problems during the climb.
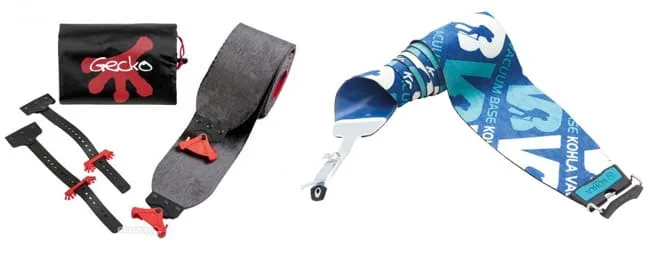
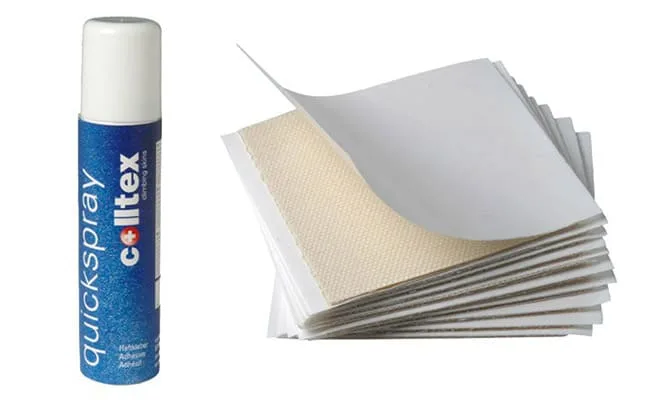
…And skins without glue!
In recent years, a new generation of skins using silicone and called “glue-free” skins have appeared. These products have many advantages: no re-gluing, little or no sensitivity to temperature changes or humidity and they do not collect all the crumbs, dust, etc. A simple wash with lukewarm water is enough to clean them . As this technology is now mature, I recommend it if you need to equip yourself.
Example of glueless skin manufacturers: Gecko, Kohla, Colltex…
Common problems when using skins for touring skis
Whatever type of skins you use, you must be careful when installing and maintaining your skins, this will prevent you from being confronted with these different problems:
- Lift-off : poorly maintained glue, a poorly positioned skin or even a layer of snow left between the ski and the skin during installation will come off the skin during your climb. You can sometimes get away with removing it and warming it against you before putting it back on. You can also apply spray glue or use a makeshift attachment with a strap or double-sided tape, but if this is not enough, you will be forced to abandon your climb!
- Booting: Sometimes snow can stick under the skins and form clogs. To avoid this, you can use a piece of wax to rub on the skin or dedicated products.
- Tears: This sometimes happens if you run over a rock or a sharp object. Try to avoid them as much as possible!
- Glue deposit on the soles: This may bother you a little when going down but above all means that your glue is at the end of its life, you must carry out re-gluing. To do this, I advise you to contact a specialized store, which for a few dozen euros will restore your skins to new condition!
Maintenance and tips for using ski touring skins
It is important to take care of your skin, it will make your life easier during your next outings. Here are some tips for use and maintenance:
- Do not glue your skins on top of each other, you risk damaging the glue more quickly than expected. Skins usually come with a protective plastic or grid that you need to stick them to before folding/rolling them up. For skins without glue, simply roll them on themselves.
- Whether at home or at the shelter in the evening, to dry them, avoid sources of heat that are too intense: chimney fires, radiators, in direct sunlight, etc.
- To improve glide and reduce the risk of beating, you can rub your skins with a block of wax.
- When the temperatures are very cold, I advise you to put your skins close to your body to prevent them from freezing. Then clean your soles well before gluing them, there should be no snow or ice crystals remaining.
- Never leave your skins stuck to the skis. You would damage your soles and the glue on the skins. When you store your skis after an outing, store the skins once dry in the small bag provided for this purpose!
- During the off-season, store them in a plastic bag to prevent the glue from drying too much in the open air.
- To do a complete re-glue, you will first need to remove the old glue. Then use a roll of new glue that you heat. Leave to dry for at least 24 hours before using it. I advise you to use a professional for optimal results.
You are now an expert on ski touring skins! All you have to do is monitor the snow conditions and enjoy beautiful hikes around your favorite resort :)
Themes